Creating My PHP Blog: Step-by-Step Guide
Table of Contents
Overview
This guide documents the creation of my PHP blog over two days, detailing each step of the process.
Day 1: Project Setup
Step 1: Initial Setup
- Create a New Directory:
- Create a folder for your project and name it as you wish
blog_project(example): - Run the command in your terminal:
mkdir blog_project cd blog_project - Inside the
blog_projectfolder create subdirectories to organize your code:mkdir .docker touch .docker/Dockerfile touch docker-compose.yml mkdir assets mkdir assets/css mkdir assets/images mkdir assets/js touch assets/css/style.css touch assets/js/main.js mkdir src cd src touch index.php touch about.php touch blog.php touch send_emails.php touch subscribe.php touch unsubscribe.php touch subscribers.txt mkdir md mkdir templates touch templates/header.php touch templates/footer.php .dockerfolder will contain your Dockerfiledocker-compose.ymlwill define your Docker containersassetsfolder fill contain your css, js file and images foldersrcfolder will contain all your PHP code and HTML filesindex.phpwill have your main page code(what user will see when he goes to your website)about.phpwill have your code for about pageblog.phpwill have your code for displaying of your post cards and your post markdown textessend_emails.phpwill contain your email sending codesubscribe.php && unsubscribe.phpwill handle your subscribe and unsubscribe functionalitysubscribers.txtwill contain emails of your subscribers for weekly or bi-weekly emailingsrc/mdwill contain your posts markdown textstemplateswill contain your header and footer file that you can include in all your pages
- Create a folder for your project and name it as you wish
Step 2: Initialize Git Repository
2.1 Initialize Git in Your Project Directory:
- Open your terminal and navigate to your project directory.
- Run the command:
git init
- Run the command:
2.2 Add the GitHub Repository as a Remote:
- You need to add the GitHub repository URL as the remote origin. Make sure to replace
youraccountandyourrepositorywith your actual GitHub username and repository name:- Run the command:
git remote add origin https://github.com/youraccount/yourrepository.git
- Run the command:
2.3 Add Your Project Files to Git:
- Add all your project files to Git’s staging area by running the following command:
- Run the command:
git add .2.4 Commit Your Changes:
- Run the command:
- Create an initial commit with a message:
- Run the command:
git commit -m "First commit"2.5 Push Your Code to GitHub:
- Run the command:
- Push your local project to the main branch of your GitHub repository:
- Run the command:
git push -u origin main
- Run the command:
- If GitHub asks for authentification, provide your GitHub username and personal access token(password).
- Now your project is connected to the repository, and the code is pushed to GitHub!
Step 3: Lets go with Coding
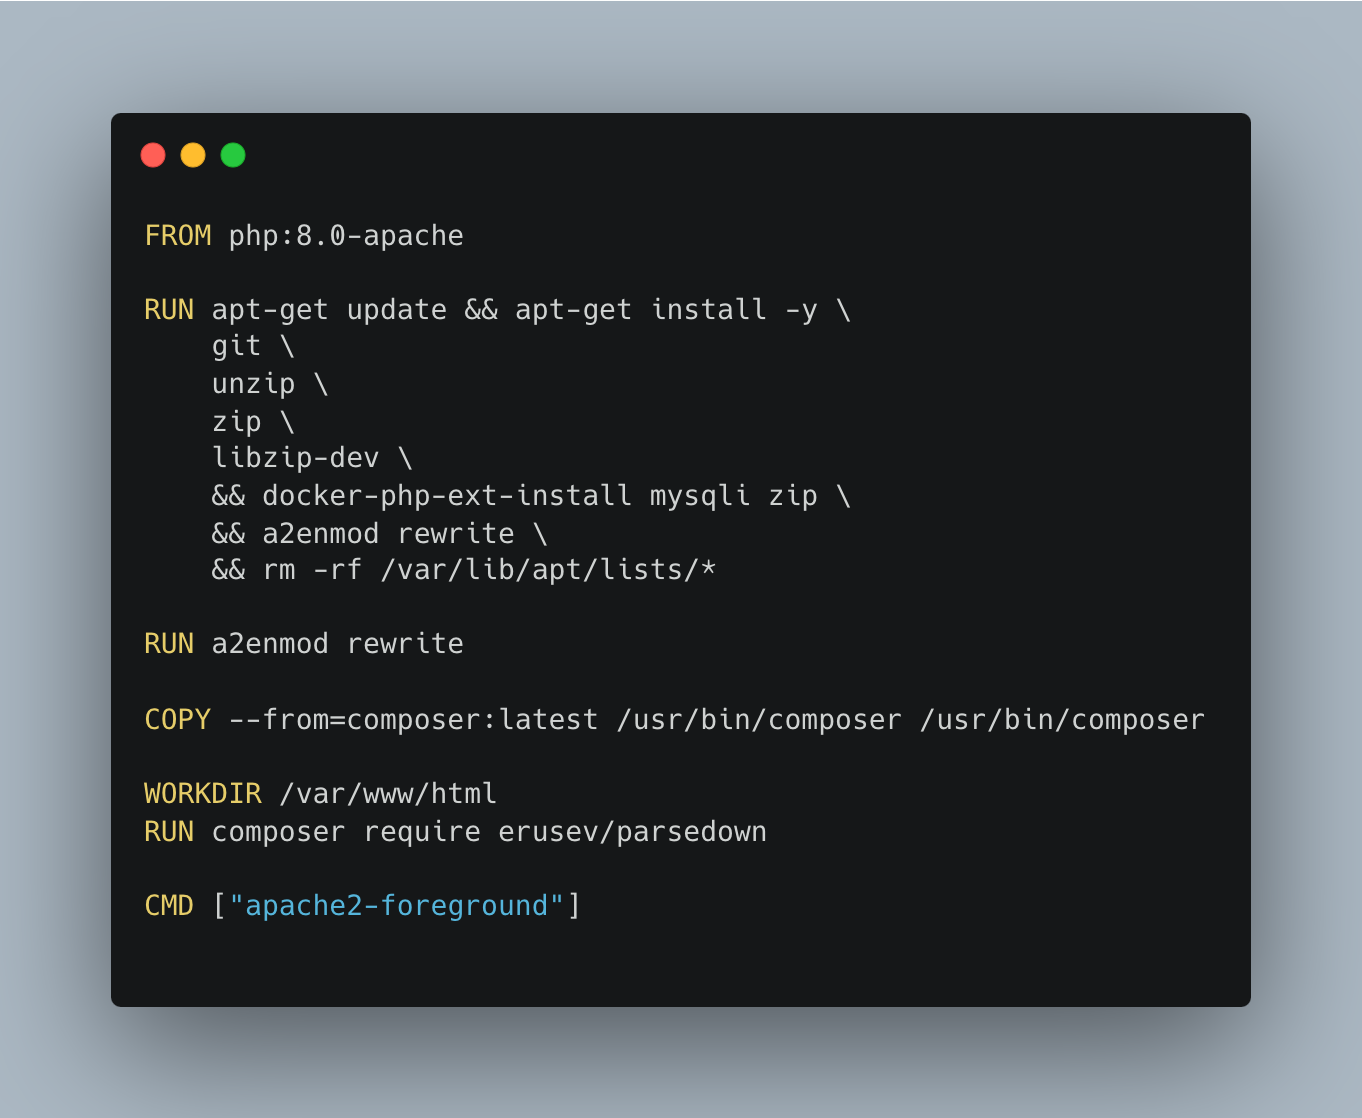
3.1 Dockerfile:
-
Open your Dockerfile in .docker folder and write this code:

-
Click here to read the full explanation of the Dockerfile code.
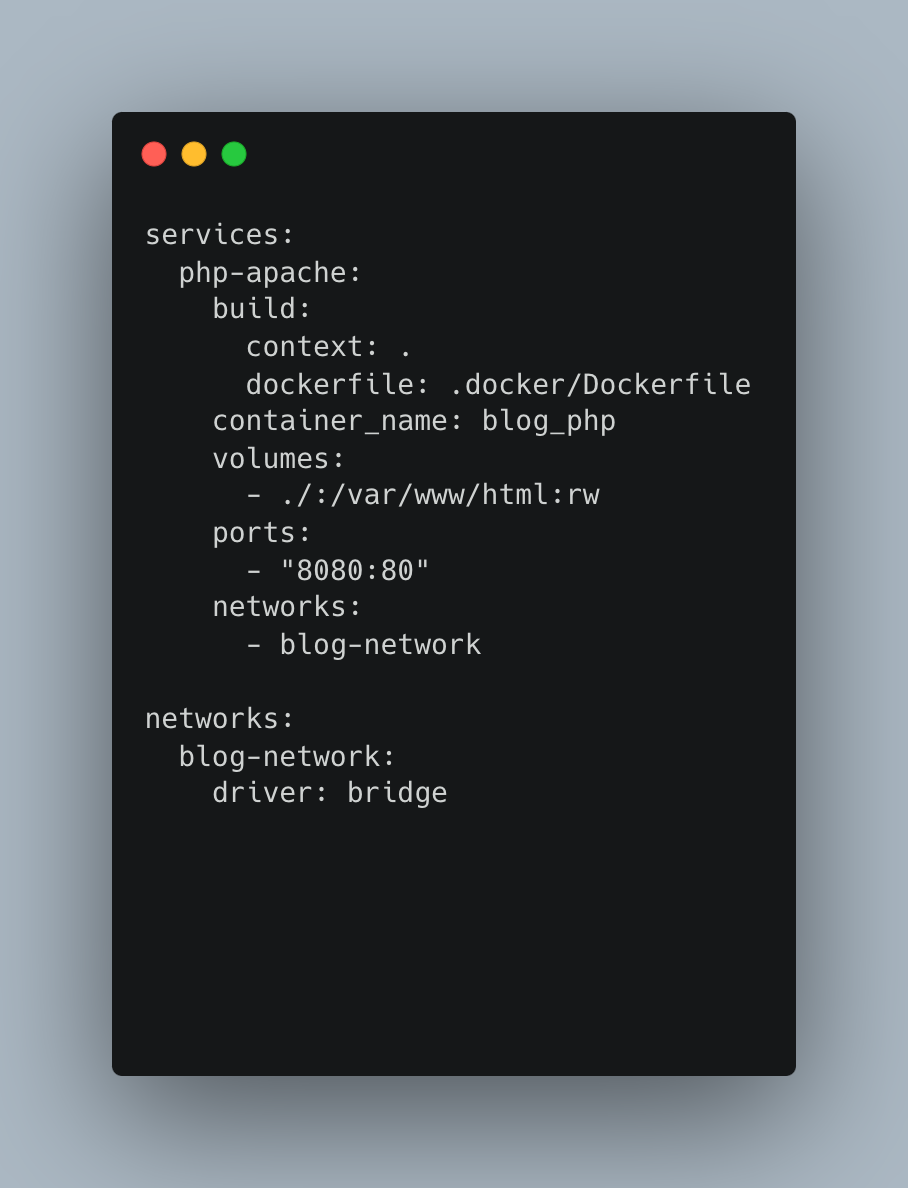
3.2 docker-compose.yml:
-
Open your docker-compose.yml file

-
Click here to read the full explanation of the docker-compose code.
3.3 Start the docker:
-
Open your terminal in PHPStorm or VSCode
-
Run the command:
docker-compose build
docker-compose up -d
After running these commands, you should see your Docker containers up and running.
 If everything looks good, congratulations—you've successfully created your Docker containers!
 -
Next, create an index.php file in your src folder and add the following simple code:
echo "If the page is working i should see thix text on my screen!";
-
Now, when you visit your localhost in your browser, you should see this message displayed on the screen.
3.4 Header && Footer:
-
Open your header.php file and add this code into your file:

-
Open your footer.php file and add this code into your file:

3.5 Main Page:
-
Open your index.php file and write this code:

-
dont forget to include your profile pic!
Go to the SECOND PART and follow next steps: